Elektrische Schlafaugen Cougar 1967 & 1968
|
Electric Headlight Covers for 1967/68 Cougars |
| In another article we converted the vacuum operated headlight door system in 1969/70 Cougars to an electric setup. Unfortunately that design will not fit 1967/68 Cougars because of major differences between the two headlight door systems. |  |
| Not having a 1967 or 1968 Cougar in to tinker with significantly hindered my development of a system for those cars, at least until now. Being known as the local Cougar nut has paid off. A 1967 Cougar owner in the area not only wanted a similar setup for his car, he was willing to loan me his Cougar so I could build it.
As with the 1969/70 design, the requirements for the new system were that it had to bolt in without modifying any original parts, it had to use readily available materials, and it could not significantly increase the power load. As with the earlier design, the hardest part of the conversion is the fabrication of the lever arm and motor arm. Obviously, there are some electrical modifications, but no wires are cut or spliced. This system is more expensive than repairing the original system, but it has the advantage of being easier to troubleshoot and it cleans up the engine bay by removing the vacuum hoses and all of the associated parts. The new setup utilizes the same attachment points used by the original vacuum motors and mounts in the same places as the original motors. This design uses the same door stops as the vacuum system—they are not modified at all. This is important to note because, if the doorstops are mis-adjusted or worn out, the doors will still bounce around, not as much as before, but this setup will not eliminate the bounce. The arm lengths are designed to hold the door in the correct position when open or closed, but not having properly adjusted stops to rest against will let the doors bounce around slightly. Plan on at least three days to build and install this system, two for building the parts and one to put them in. Two motivated people can do this project in a weekend, but it's never a good idea to rush when dealing with pot metal. This design is easier to build and install the 1969/70 system because the motor arms connect directly to the headlight doors, eliminating the center bushings and spring supports required in the 1969/70 design. |
| MIG welder | Hammer | ||
| Welding helmet | Wire strippers | ||
| Hearing protection | Awl or scribe | ||
| Safety goggles | Dremel tool with cone shaped burr | ||
| Ratchet with 3” & 6” extensions | Tape Measure | ||
| Sockets: 7/16”, 3/8” 1/4”, 10mm, & 14mm | Soldering iron & solder | ||
| Wrenches: 7/16”, 1/2” & 3/8” | Shrink wrap tubing | ||
| Drill & bits: 9/64” 2/4" & 5/16” | Lighter/heat gun/hair dryer | ||
| Small flat blade screwdriver | Liquid electrical tape paint (Semi Flat Black) | ||
| Philips screwdriver | Dielectric grease | ||
| Hacksaw | Safety wire, 1’ | ||
| Round & flat files | Sandpaper: 100 & 220 grit | ||
| Bench vice | Primer | ||
| Vice grips | Towels, 2 | ||
| Clamps | Plastic bag | ||
| Pliers |
| OPTIONAL TOOLS |
| Angle grinder | 7/8” hole saw | ||
| Grinding & cutting discs | Framing square | ||
| Jigsaw | Silicone lubricant | ||
| Flexible adapter |
| The design described in this article requires welding, which can raise the overall price if you have to pay someone else to do it. It is possible to modify the design so it can be built without welding, although it will not look as clean and could introduce some unwanted slack in the system.
The total cost of the project depends on how good a deal you can cut for the junkyard headlight door motors, but the overall price should be well under $200. The cost of the system in this car was just under $140, with most of the cost being the $50 each for the two electric motors. PARTS |
| One 1989-92 Ford Probe headlight door motor (Driver side) | |
| One 1989-92 Ford Probe headlight door motor (Passenger side) | |
| One relay connector with five terminal wires | |
| One relay (Advance Auto Parts part # PA 5972817, Relay MR16) | |
| One 30A circuit breaker | |
| Six 1/4” bolts—2-1/4” to 2-1/2” long | |
| Six 1/4” lock washers | |
| Six 1/4” nuts | |
| Twelve 1/4” washers | |
| Six 1” long 5/16” bolts, coarse thread | |
| Four 1” long 5/16” bolts with 1/2” shoulder, fine thread | |
| Six 5/16” nuts, coarse thread | |
| Four 5/16” self locking nuts, fine thread | |
| Ten 5/16” washers | |
| Two 5/16” large diameter washers | |
| One to four medium vacuum caps | |
| One body plug (to fill in hole where hoses went—'69/70 frame plug works) | |
| Four 5’ lengths 18-20 gauge wire, color coded | |
| Two ring terminals for 18-22 gauge wire | |
| One 1’x1’x1/8” plate steel | |
| Two 2” x 7” 22 gauge steel |
| For the metal, check the Yellow Pages under "steel" for a company that sells steel. Most will sell steel plates of any thickness in one foot increments. A 1' x 1' plate of 1/8" material is more than enough to make everything here. If a single piece of metal isn't available, weld two pieces of 3" material together to make the motor plate. Three-inch material is typically available at most home improvement stores in addition to the 1-1/2" and 2/4" material required for this project.
The best source for the Ford Probe headlight door motors is a junkyard because they are less expensive and you can get both sides of the electrical connector there. That way you do not have to splice into the wiring harness again to replace the motor should it ever require replacement. Buy the relay before you go to the yard so you can ensure the connector fits before you buy it. The electrical connector must fit your relay and have wires in all the slots, as all five terminals are used on the relay. While relays are available at the junkyard, it can be tough to know if you are getting the right one. Cut the wires at least three to four inches away from the connector to leave room for soldering additional wire on later. When buying the motors, make sure to pick up the rubber boots that are on the bottom of the motors. They are essential to protecting the motors from rain and moisture. It is a good idea to test the motors at the yard before bringing them home. To test a motor, connect the black wire to ground and the black wire with a white stripe to power. Touch one of the remaining wires to power. The motor arm will rotate 180 degrees and stop, or do nothing. If it does nothing, disconnect that wire and connect the other wire. The motor should then rotate 180 degrees and stop. Now disconnect that wire and connect the other wire. The motor arm should rotate 180 degrees back to the original position. Once the motor rotates, disconnecting and reconnecting the same wire should have no effect on the motor. Connecting both of the remaining wires to power at the same time will make the motor rotate continuously. If the motor doesn't turn, look for another one. Note that the wire colors are the ones after the connector since the wire colors change at the connector. If you could not get both sides of the connector, black is still ground, white with a red stripe is constant power, and the red and yellow are the remaining two wires. DISASSEMBLY To get the vacuum motors out, the grille has to come out. Start by disconnecting the four long springs. The easiest way to disconnect them is with a one foot piece of wire folded in half. Put the fold on the end of the spring and pull the spring until it clears the support, then slowly release the spring. Repeat this for all of the springs. Unplug the four headlights next. After this, remove the four bolts holding the center grille section in place, followed by the four bolts that hold the two grille sections to the hood latch supports. A 1/2" socket with a short extension works well on all of these bolts. Use a screwdriver to remove the clips on the arms of the vacuum motors and push the arms clear of the grille doors. Remove the two nuts in the back of the grille with a 7/16" deepwell socket, then remove the two bolts in the top of the grille with a 3/8" socket. The one under the fender extension is hard to reach, but it will come out without removing the trim. Place towels on the bumper and over the top of the grille, then carefully lift out the grille section. A second set of hands on the end to prevent the grille from hitting the splash panel, bumper or extension molding is highly recommended. Remove the other grille section after the first one is out. |
| The arrows point to the mounting nut and bolt locations. Remove the center top bolt last. This will keep the grille in place while removing the other nuts and bolts and make it easier to support the grille when removing the last bolt. | 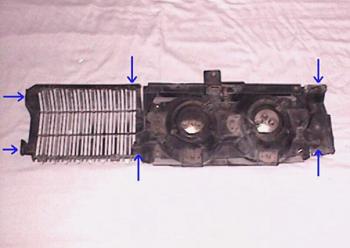 |
| With the grille out, unplug the vacuum hoses from the vacuum motors, then use a 7/16" wrench to remove the nuts holding the vacuum motors in. When the carriage bolts are pushed clear of the housing, the vacuum motors can be lifted out. Put all of the nuts, bolts, screws, and clips into a plastic bag so they will not get lost. Keep the vacuum motor nuts and bolts handy; they are reused later to install a bracket.
Disconnect the vacuum line above the driver's side headlight door going to the vacuum reservoir. Pull the vacuum motors lines clear of the radiator support. Pull the hoses out of the clips along the driver's side fender apron and pull the vacuum hoses up onto the fender. Disconnect the vacuum hose at the manifold and install a vacuum cap. What happens next depends on the model year. For Cougars with the solenoid on the fender apron, unbolt the solenoid, pull the vacuum line out of the firewall, disconnect the red w/yellow stripe wire, then pull the hoses and solenoid out of the car. For Cougars with the three vacuum lines going into the passenger compartment, go inside the car and disconnect the three hoses at the headlight switch. Install vacuum caps on the switch so dirt cannot get inside the switch. Push the connector out of the firewall, then remove the vacuum hoses from the car. In either case, insert a body plug into the openings left by the vacuum hoses. Next, turn the front wheels to the right to gain access to the vacuum reservoir under the left fender. Remove the four 3/8" screws holding the tank to the brackets, then remove the four 3/8" screws holding the brackets to the fender to finish removing the vacuum reservoir. CONSTRUCTION The electric motor bracket is made up of two parts, the motor plate and the mounting plate. The motor plate is a 4-1/2" x 5" plate with holes drilled in it for mounting the motor and for the armature. The mounting plate is a 3-1/2" x 1-1/2" plate used to bolt the mounting plate to the car. The mounting plates are easy to make, simply drill two holes in each plate according to the diagram below. The motor plates are a bit harder. Using the same diagram as a reference, drill the holes for the mounting slots and motor armature. Unless you have a 7/8" hole saw, the easiest way to make the large hole is to drill a lot of small holes around the inside of the perimeter, and then go back around the perimeter and connect as many as possible by tilting the drill back and forth. This will snap the drill bit if not done properly, so take your time. Knock the center out and use a combination of round and flat files to smooth the edges. A grinder or Dremel tool is faster but files will do the job. Drill holes at the ends of the slots for the motor bolts and one in the center in between them. A 1/4" bit is the correct size, but a 5/16" bit works and makes it easier to file and easier to fit the motor in later. Elongate the center holes to connect it to the end holes. The jigsaw comes in handy here to connect the holes and to get the sides straight. Use a flat file to smooth out the edges. |
| Measure down 5/8” from the top point in the ovals to find the lower drill point. For the 7/8” hole, measure down 1” from the top point to find the lower drill point. Or, print this diagram to scale and trace the lines on the motor plate. | 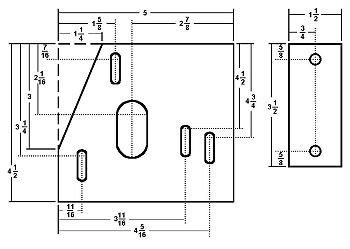 |
| After the plates are made, they have to be welded together. Although the pieces used to make the brackets are the same, the brackets are not mounted in the same spots in the headlight door buckets, which means the plates do not get welded together the same way. When making these brackets, all directional references (front, rear, left, and right) are from the front of the car and looking into the grille.
For the driver side bracket, put the motor plate on the mounting plate with the front edge of the mounting plate 2-1/2" from the front edge of the motor plate and the motor plate 1-1/8" from the right edge of the mounting plate. Use a corner brace or a framing square to hold the two pieces vertical to each other, then weld them together. For the passenger side bracket, put the motor plate on the mounting plate, with the rear edge of the mounting plate 2-1/2" from the rear edge of the motor plate and the motor plate 1-1/8" from the left edge of the mounting plate. Use a corner brace or a T-square to hold the two pieces vertical to each other, then weld the two parts together. Once the sections are welded together, take two 5/16" bolts and weld each one into the holes on the short side of the brackets. The electric motors completely cover these bolts, so it is extremely difficult to get a wrench on them. Welding the bolts to the brackets solves the problem and since the motors completely hide the bolts, it doesn't detract from the looks of the brackets. The other bolts can be welded in, but the welds will be visible so the bracket looks better if the bolts on the long side are left alone. Another option is to cut the head of the bolt off and weld the bolt flush with the top of the mounting for a really clean look. |
| The same pieces come together to form two distinctly different brackets. The passenger side bracket is the one on the left. | 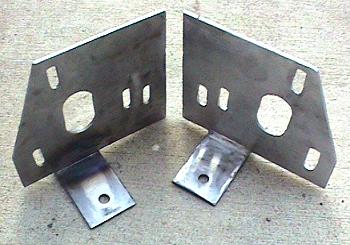 |
| The brackets require one final modification. A small notch in the bottom center of the brackets allows the wiring to go under the brackets and through the openings previously used to mount the vacuum motors. Routing the wires this way puts the connectors safely behind the bumper supports. Use a file or a grinder to notch the bottom of the brackets. |
| The notch allows the wires to be routed out the bottom of the headlight door buckets so they are protected from debris thrown up by the front tires. These brackets have the bolts on the long side welded flush for ease of installation and the smooth look it gives. | 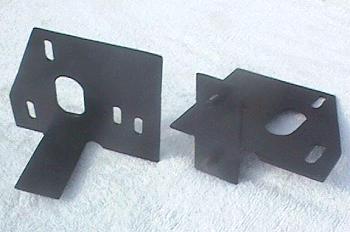 |
| MOTOR & LEVER ARMS
The motor and lever arms are the next items to make. Their dimensions are critical, particularly with the motor arms because any errors in those arms are magnified by a factor of two because these arms rotate 180 degrees for each opening or closing cycle. Because there isn't an additional lever in the system like the 1969/70 center bar, this design is not as sensitive to errors, but the old adage of “measure twice, cut once” still applies. Lever Arm The lever arm is the arm from the headlight door to the motor arm. To make them, take a 1/8" x 3/4" x 5-1/2" bar of metal and drill a 5/16" hole 7/16" from one end. Measure 4-5/8" down from the center of the first hole and drill a second one, also 5/16". For reference, this hole should also be 7/16" from the end of the bar, but the critical distance is the one between the holes, not how far they are from the ends. |
| Lever Arm: Check your measurements here closely. An error in the length of an arm will cause big problems later. | 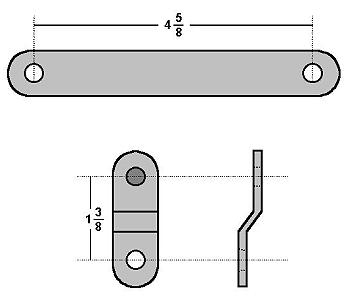 |
| This completes the basic version of the lever arm, but it can be improved. In its current form, a bolt goes through one end and into the headlight door. An improved version, which reduces the amount of slack in the system, welds the bolt to the arm. Put a 5/16" bolt into the headlight door where the vacuum motor arm used to go, followed by the lever arm, a washer, and a nut. Tighten the nut until it contacts the shoulder of the bolt, then push the nut against the arm. A shoulder is the part of the bolt that does not contain threads.
Put a mark on the part of the bolt that extends past the headlight door. Disassemble the items, then cut the bolt head and remaining shoulder off at the indicated mark. Put the bolt into the arm and weld it to the arm. Grind the weld smooth and round the ends of the bar to finish the arm. For a really clean appearance, file the shoulder of the bolt into a cone before welding it to the arm. That way, the weld can be ground flush and still retain enough strength to keep the bolt in place. |
| While the welded on bolt looks better, both designs work equally well. A bolt with a shoulder is used so the headlight doors rotate on a smooth surface instead of on the threads. Make two of these arms, one for each side. | 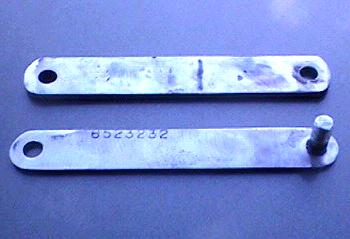 |
| Motor Arm
The motor arm is the arm that gets bolted directly to the motor shaft. The easiest way to make the motor arm is by cutting off the old connector on the original arm and adding some metal to it. First, cut off the end of the original lever arm at the bend that is most distant from the motor shaft hole. Cover the tapered hole so welding splatter cannot damage the grooves before welding a 1" x 3/4" x 1/8" piece of metal to the original arm. Measure 1-3/8" from the center of the tapered hole. Make sure you measure parallel to the flat sections and not diagonally across the piece, or the hole will be in the wrong place. A framing square works best, but a tape measure will do the job. Mark the second point. Center punch the mark with an awl to ensure the drill bit doesn't drift when drilling the hole. Drill a 5/16" hole at that point. Cut and weld a 5/16" bolt into the motor arm. Use the same method used with the lever arm, but this time use the lever arm instead of the headlight door to get the correct spacing. The bolt gets welded to the motor arm, not the lever arm. A second option is to fabricate the entire arm from a 1/8" x 3/4" x 3" piece of stock. It takes a bit more work and a tapered reamer to do the job right, but it can be done. The 1969/70 headlight door motor article has the instructions on how to fabricate a new motor arm if the original motor arms are missing from the electric motors. |
| The original motor arms, shown below a new lever arm, came with a ball stud and a tapered hole. In the finished version on the lower right, the bolt has been welded flush. A good weld on the side of the bolt head that faces the tapered hole will work just as well and cannot be seen once installed. | 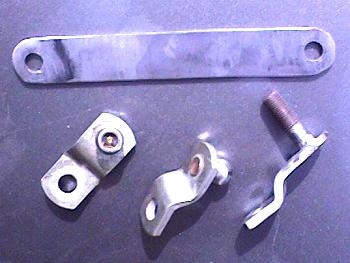 |
| WIRE SHIELDS
The last items to build are protective shields for the wires. Take the 2" x 7" pieces of sheet metal and drill a 1/4" hole 1/2" from the top and 1/2" from the side in each piece. At the other end, use a 5/16" bit to drill three holes that are between 1-1/4" and 1-3/4" from the edge. Cut out the material between the holes with the Dremel tool to form an oval. On the bottom of the pieces, under the ovals, cut out a 1/2" high notch to about the middle of the ovals. Now fold the pieces at 3-1/4" as measured from the side with the small hole. These two pieces are mirror images of each other, so fold the second one in the opposite direction from the first one. |
| This bracket protects the wiring from debris thrown up by the tires while the bumper protects the wires from the front. The notch is required to clear the bumper support. Once these parts are made, all of the parts can be painted. | 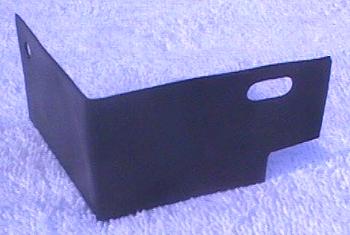 |
| INSTALLATION
The first items to go in are the wiring shields. Use the original carriage bolts to attach the brackets to the headlight housings. Use 5/16" nuts and bolts, along with some washers, to connect the other side of the shields to the front of the radiator support. It isn't always a perfect fit, so bend the brackets forward or backward slightly to line up with the radiator support. The oval on this end allows moderate adjustments while keeping the front edge flush against the housing. |
| An earlier setup had the connector coming out the large oval hole above the bracket, but that location requires a larger and more complex bracket to protect the wires. To make installation easier, a J-nut was used instead of a regular nut. | 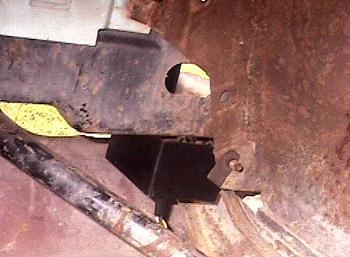 |
| Attach the motors to the brackets midway along the slots using the 2-1/2" long 1/4" bolts. The correct sequence is 1/4" washer, bracket, motor, 1/4" washer, 1/4 lock washer, and 1/4" nut. Do not tighten the nuts yet—the motors still have to be adjusted later. The Probe motor stamped R2 goes into the passenger side bucket, while the motor stamped L1 is for the driver side.
Insert the motor's wiring connectors into the square holes in the bottom of the brackets, where the vacuum motors used to sit. Push the wires out the back of the hole. It's tight on the passenger side, but the wires will fit. Just rotate the connector until it can clear the bolt. The driver side goes in without a problem. Put the brackets in and bolt them in place. Make sure the brackets are square in the housings with the motor wires in the notches in the bottom of the brackets and that the headlight wires are not pinched between the brackets and the housings. Because one of the holes in each headlight bucket is much larger than the other, oversized washers must be used when bolting the brackets in. Slice off a section of the washer, if necessary, to clear the vacuum motor mount. Before tightening the nuts, check again to make sure none of the wires are pinched between the bracket and the housing. WIRING The wiring is pretty simple, with only two decisions required. The first is where to put the relay and the second is where to pull the power. Put the relay in the engine compartment and fewer wires have to be run into the passenger compartment, but the relay has to be protected against the weather. If the relay goes in the engine compartment, you also have to decide where you will get power—directly from the battery or from the fuse panel. The issues here are looks and the amount of work involved, all of the options work equally well. The simplest solution is to mount the relay in the engine compartment and to pull power from the starter solenoid's positive terminal, and that is what was done here. |
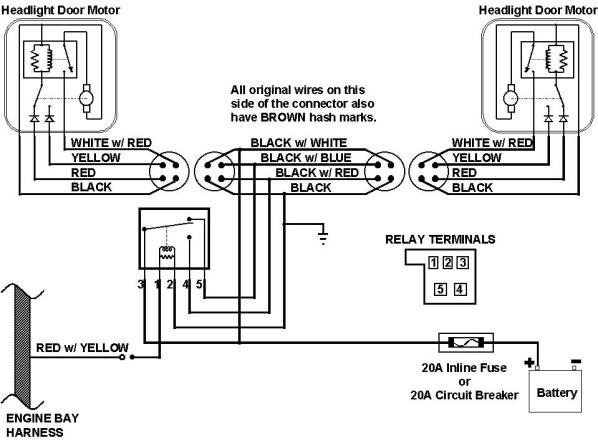 |
| This is the 1967 wiring diagram. The 1968 wiring is different only in that the signal has to be pulled from inside the passenger compartment while it is already available in the 1967 engine bay. |
| Despite what the diagram implies, the motors do not draw any power when the doors are stationary, only when the doors are opening or closing. While a constant 12V is applied, the motors do not draw any power when stationary due to how they are wired internally. So the only power drain from this setup, besides when the doors are opening or closing, is from the relay. It only draws a couple of milliamps of power when the doors are open and none when they are closed, so it will not drain the battery.
Each motor connector has four wires: Black with a white stripe (Power), black (ground), black with a red stripe (the open signal for this design), and black with a blue stripe (the close signal for this design). Solder a wire to each of the four wires in each connector and lay the wires beside the original wiring harness until they reach the relay. For every splice made, cover the solder with liquid electrical tape. When that dries, cover the splice with some shrink tubing. Repeat this process for every splice in the engine bay to protect the joint from corrosion. While finding enough wire to keep the same color codes throughout the system is not impossible, it can be difficult. When color codes in a circuit change, making a table like this one to track the changes is a good idea. Tuck the resulting table into your files for troubleshooting and later reference. |
| DOOR MOTOR |
DOOR MOTOR CONNECTOR |
CONNECTING WIRE |
RELAY TERMINAL |
CONNECTING WIRE |
VEHICLE WIRE |
| — | — | — | #1 | . | RED with YELLOW stripe |
| BLACK | BLACK with BROWN hash marks | . | #2 | . | BLACK (Ground) |
| WHITE | BLACK with WHITE stripe and BROWN hash marks | . | #3 | . | POWER: Starter Solenoid or Fuse Box |
| RED | BLACK with RED stripe and BROWN hash marks | . | #4 | — | — |
| YELLOW | BLACK with BLUE stripe and BROWN hash marks | . | #5 | — | — |
| Plug the connector into the motor and run the wires along the original wiring harness until they reach the relay, removing any slack in the wires along the way. Repeat this process for the other motor. The motor connectors should end up over or just inside the bumper supports.
Next, run a wire from the starter solenoid (or fuse box) to the relay. Find a good spot to ground the system and run a wire from there to the relay. The ground wire beside the voltage regulator is always a good place to tie in the ground. For later reference, this wire will be called the primary ground wire. The final wire to run is the signal wire. For Cougars with an external vacuum solenoid and the relay going in the engine compartment, run the wire from the relay to the original signal wire. Otherwise, run the wire from the relay to the headlight switch. For those Cougars with wires that have to go through the firewall, punch a small hole in a body plug with an awl, run the wire through the hole, and then to the light switch. The 1969/70 frame plug that is in the frame rail on the opposite side of the bumper bracket bolts is a good fit for the holes left when removing the vacuum hoses. At the relay, connect the two ground wires from the motors and the primary ground wire to the ground wire for the relay (the #2 terminal). Connect the wire from the starter solenoid's positive terminal to a 30A circuit breaker (or an in-line fuse holder). Run a wire from the other end of the circuit breaker to the relay and connect the wire, along with the two power wires from the motors (Black with White stripe) to the relay's Power In wire (the #3 terminal). Connect the two Door Open signal wires to the wire going to relay terminal #4. Next, connect the two Door Close signal wires to relay terminal #5. Connect the signal wire to relay terminal #1 to complete the connections at the relay. Plug the relay in and tuck it out of the way for a moment. Install a ring terminal on the main ground wire and connect this wire to the body using the same bolt used to mount the voltage regulator. Install a large ring terminal on the wire going to the starter solenoid. Connect this wire to the starter solenoid on the same side as the battery's positive cable. That last wire, from relay terminal # 1, goes to the red wire with a yellow stripe. In 1967 Cougars that wire is accessible via a bullet connector underneath the wiper fluid tank. Attach a matching bullet connector and plug it into the wiring harness. For 1968 Cougars, this wire is run into the passenger compartment. Next, remove the red wire with a yellow stripe from either the dimmer switch connector or the headlight switch connector. Either will work, but the dimmer switch connector is much easier to get to and work with. Using a paper clip or fine screwdriver, push the tab on the side of the metal terminal in and release the terminal from the connector. Plug the new female terminal into the connector. Slide a section of shrink tubing over the wire, then plug the remaining new terminal into the old terminal. Cover the connection with shrink tubing and electrical tape and tuck it out of the way. |
| If the female terminal doesn't have the retaining clip (not all do), make sure the wire stays in the connector when plugging the switch back into the connector. The end of the wire that isn't shown gets spliced to the wire coming in from the relay. | 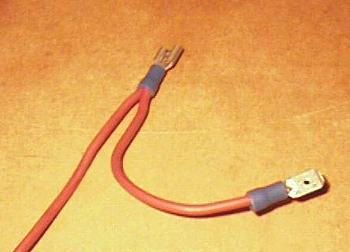 |
| For cars with the relay inside the car, use the fuse adapter to get power from one of the fuses. Make sure it's put on the power side of the original fuse. The preferred sources are either the cigarette lighter or the A/C circuits since they have are composed of large gauge wires. The fuse adapters are hard to find for the old style fuses, but the new blade style fuse adapters can be bent to work also.
Once the wires are in place, use split wrap over the original harness and the new wires to keep the wires from sagging and to improve the appearance. If a loom isn't used, tape the wires to the original harness every six to eight inches. Put the wires under the original harness and close to the fender apron and they will not be noticeable. You could also wrap the wires to the harness using non-sticky vinyl tape like the material covering the original harness, which would also give the harness a like new appearance. If it's not available locally, the Eastwood Company sells the stuff. Loosen the terminal to the ground post of the battery. While the battery must be connected to do some system checks, a quick way to disconnect power is needed if something turns out to be wired incorrectly or a motor jams. Leave the terminal on the battery but make sure it can be quickly pulled off if something does go wrong. REASSEMBLY AND ADJUSTMENTS Bolt the lever arms to the motor arms before connecting the motor arms to the motor shafts. The correct sequence is motor arm, lever arm, washer, and lock nut. Tighten the lock nut so the arms do not wobble, but can still turn freely. Bolt the motor arms to the motor shafts, with the motor arms facing straight up. Finger tight is enough for now, the nuts do not get tightened until the wiring is tested. Take the lever arms and lay them forward on the splash shield. This prevents them from getting caught in the housings and jamming the system. Turn the headlights on. The motor arms should rotate 180 degrees and point downward. Turn the lights off and the motor arms should now point upwards again. If one of the arms doesn't face up upwards, loosen the nut on the motor shaft and adjust the arm so that it does point straight up. When both arms are pointing up with the lights off, tighten the motor shaft nuts with a 14mm socket. (A six-point 9/16" socket will work in a pinch.) |
| After the wiring has been tested, lean the lever arms against the back of the housings before reinstalling the front grille section. When the grille is back in and properly aligned, connect the lever arms to the headlight doors. The motor connector is shown here going out the oval hole, which is not correct. Run it out under the bracket and out the bottom of the housing. |  |
| Make sure the headlight door is properly aligned in the closed position before continuing. Don't forget to reattach the springs and plug the headlights back in. For headlight doors with stops in good condition, pull upward on the motor, not the arms, and tighten the 1/4" motor retaining nuts. However, if the stops are worn out, instead push downward on the motor until the headlight door is properly lined up in the grille. Do not push down so hard that the headlight doors begin to open. The intent in both cases is to remove the slack from the system without affecting the door position.
Tightening the three motor mounting bolts is a difficult task due to the extremely limited space, so make sure the doors are properly aligned before starting. Readjusting the position of the motor is not something you want to have to do. The top nut and bolt are notably hard to get to because they are very close to the grille and the arm blocks access, so these bolts should be tightened last. If the motor, bracket, nut, or bolt touches the grille, loosen the bracket mounting nuts and push the bracket to the back of the housing, after rerouting the headlight wires over the bracket. This should produce enough clearance to tighten the nut and get the grille off of the motor. Before tightening the top bolt, unplug the relay and turn the white wheel at the top of the motor until the arms rotate enough to put a socket on the bolt head. (Technically the white wheel is on the bottom of the motor, but the motor is mounted upside down here so the wheel is now facing up). When the nuts are tight, plug the relay in and turn the headlights on. Check to make sure the door is completely open. At a minimum the door must be within 1/2" of the stop. If not, or if the door hits before the cycle completed, the arms are wrong and have to be modified. Turn the lights off and the door should go back to its correct closed position. CAUTION: The relay must be removed before turning the white wheel on the motor! Failure to remove the relay can cause the motor to cycle when the knob is turned and could trap your hand between the door and the headlight housing. While it will not fix major errors, the motor arm can be shortened or lengthened by judicious hammering at the bends, and this is much easier than making new arms. Put the arms back in place and see if the door now opens properly. Cycle the motor back down to the closed position and make sure the door still closes completely. If it does not, adjust the position of the motor until it does, then retest the opening cycle. Install and adjust the second headlight door motor using the same procedures. Install the water boots on the bottom of the motors to finish the conversion. |
| The motor covers help blend the motors into the housing, giving the parts a factory look. The boots are not optional, though. They protect the motors from the elements and keep metal away from the magnets inside the motor housing. | 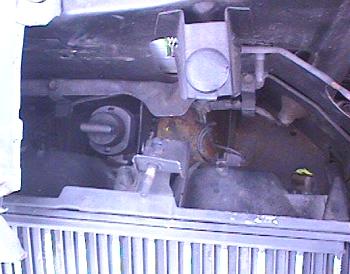 |
| EMERGENCY PROCEDURES
If something in the system fails, the headlight doors have to be able to be opened manually. That's the reason for the white wheel on the motor. Turning that wheel counter-clockwise will rotate the motor and lift the doors. The wheel is easy to turn initially, but it isn't possible to get the door completely open because the headlight door covers the motor as the doors open. If a door fails to open, unplug the motor that is not working, then turn the wheel counter-clockwise until you cannot turn it anymore. Another option is to leave a 1/2" wrench in the trunk to disconnect the arm if problems occur. A third option is to use the clip design used in the 1969/70 setup in the motor arm instead of a bolt. It takes longer to make the stud, but removing a C clip is much easier in an emergency than removing a locking nut, especially at night, and can be done with a car key. TROUBLESHOOTING CHART |
| SYMPTOM | POSSIBLE PROBLEMS |
RECOMMENDED SOLUTIONS |
| Doors open once, but do not close | Motor arm and/or lever arm are too long | Confirm lengths of both arms. Adjust lengths as necessary. Manually cycle though one complete revolution of the motor to ensure the motor isn't binding with new arms. |
| . | Blown fuse | Replace fuse. Manually cycle though one complete revolution of the motor to ensure an incorrect arm length didn't cause the motor to bind and blow the fuse. |
| . | Motor arm is jammed against mounting bracket | Raise motor in bracket and readjust. If required, lever arm can be shortened to accommodate new position. |
| . | Bad Relay | Test by reversing the #4 and #5 wires. If doors then close, but the doors now will not open, replace the relay. |
| Doors do not fully open | Motor and/or lever arms are too short | Confirm arm lengths. Lengthen motor arm as necessary. |
| Doors do not open or close | No power | Check the relay power input (terminal #3) for power. Check fuse if no power is present.
Apply power to terminal #1 and listen for click. If the relay doesn't click, check the ground wires. |
| . | Motor(s) unplugged | Plug motor(s) into circuit and retest. |
| . | Motor arm is jammed against mounting bracket | Raise motor in bracket and readjust. If required, lever arm can be shortened to accommodate new position. |
| Relay makes a clicking noise, but doors do not open | No power at main feed | Check relay terminal #3 for power. Check fuse if no power is present. |
| . | Poor connection(s) | Check connection on relay terminal #5. Check all ground wires. |
| Unusually hard or noisy contact between door and grille assembly | Rubber pads are missing in grille assembly | Install new rubber stops in grille assembly. |
| . | Motor and/or lever arm is slightly too long | Change arm lengths or readjust motor position to compensate. |
| . | Grille assembly is slightly misaligned and outer edge of door is hitting grille assembly | Realign Grille using factory guidelines. |
| Doors swing past the stop point and stay partially open or closed | Motor arm is out of position | With the system in the off position, realign the motor arm to be in a straight line with the lever arm. Tighten the motor shaft nut securely. |
| Doors open when lights are off and close when lights are on | Wires between motor(s) and relay are reversed | Connect wires according to wiring diagram.
Reverse wires between #4 & #5 terminals at relay. |
| . | Motor arm installed 180 degrees out of phase | Remove motor arm and reinstall it pointing in the opposite direction. |
| Doors rattle when driving | Improperly adjusted or worn out headlight door stops | Adjust doorstops to correct position or replace with new stops. |
| Lever arm appears tilted to one side | Mounting bracket out of position | Move bracket left or right to correct lever arm position. |
| . | Lever arm on wrong side of headlight door | Move arm to outside of headlight door. |
| . | Spacing is off | Add washers between lever arm and motor arm or between lever arm and headlight door to correct spacing. |
| POST PRODUCTION NOTES
Lever Arms The lever arm can be made using any of the designs shown in the 1969/70 setup. The lever arm is not nearly as visible here, so the flat design was used as it is the easiest to make. The other designs will work, but the effort probably isn't worth it because the only part of the bar that is readily visible is the top. If the clip design from the 1969/70 design is used instead of a bolt, disconnecting the headlight doors from the arm is much easier should the system malfunction. Electrical Issues The system should work with a 20A circuit breaker, but since a 30A circuit breaker was used during development and testing, that is what is recommended. Also, during testing, the original relay failed. As it was an old relay, it is possible that the cause was just old age, but due to time constraints it wasn’t possible to run the system for an extended period of time to adequately test a new relay. If the system does blow a new 30A relay, the solution is to modify the wiring to include a relay for each motor. This shouldn't be required, but without further testing I cannot definitely say that it will not be. Copyright The design for this project is mine and it's not for sale. You are free to use the design to make the setup for yourself or to help a friend make one, but you cannot manufacture them for sale or sell the plans. To borrow a term from the software industry, this design is now Freeware. The plans or the final product cannot be sold for profit. As before—my design, my choice. Photos by Donna & Bruce Habel
|
Quelle: http://www.theclassiccougarnetwork.com/tccn2/tech/restomod/restom09/restom09.html